2014年12月30日 星期二

Lab10-ARDUINO回授伺服機SERVO-Knob第10個實驗


這個用的是  Tower Pro 的 micro servo99 之 SG90 伺服機 ,不知道買到的是不是盜版,因為感覺有點澳
ARDUINO UNO R3 版
開發環境 1.5.8 IDE 

材料
要幾條線
跟一個伺服機
麵包版
可變電阻旋鈕
ARDUINO UNO 版(別的應該也可以)
USB 線連 ARDUINO 版
原始 範例程式碼 來自 Arduino 開發環境 FILE\EXAMPLES\SERVO\KNOB ==>以下程式後來進行了修改
1.限制轉動角度MAPPING不超過1015,不小於10
2.輸出到監控畫面 val and volt(計算過後的電壓) Angle(計算過後的絕對角度)

/* 
 Controlling a servo position using a potentiometer (variable resistor) 
 by Michal Rinott <http://people.interaction-ivrea.it/m.rinott> 

 modified on 8 Nov 2013
 by Scott Fitzgerald
 http://arduino.cc/en/Tutorial/Knob
*/

#include <Servo.h>

Servo myservo;  // create servo object to control a servo

int potpin = 0;  // analog pin used to connect the potentiometer
int val;    // variable to read the value from the analog pin

/////////////////////////////
float volt ; //   additional -2014-dec-30th -Monitoring voltage
float Angle; //  additional -2014-dec-30th -Monitoring voltage
///////////////////////////////

void setup()
{
  myservo.attach(9);  // attaches the servo on pin 9 to the servo object
///////////////
  Serial.begin(9600);  //  2014-dec-30th -Monitoring voltage
///////////
}

void loop() 
{ 
  val = analogRead(potpin);   // reads the value of the potentiometer (value between 0 and 1023) 
  
  ////////below added 2014 DEC 30th
  volt=val*(5.0/1023.0) ; //cal the voltage ,
  //must use float and 5.0 digital point 
   Angle=val*(180.0/1023.0) ; //cal the angle
   Serial.print(val);
  Serial.print("   Voltage : ");
  Serial.print(volt);
  Serial.print("  Angle:   ");
  Serial.println(Angle);
  /////above added 2014 DEC 30th
  
  if ((val>10) && (val<1015)){
  val = map(val, 0, 1023, 0, 180);     // scale it to use it with the servo (value between 0 and 180) 
  myservo.write(val);                  // sets the servo position according to the scaled value 
  delay(15);                  // waits for the servo to get there 
  }
  
  //////  below additional -2014-dec-30th -Monitoring voltage
  if (val<10) {
    Serial.println(" below 10"); //safe control
  }
  if (val>1015) {
   Serial.println("  over 1015"); //safe control
    }
 //////////////////////////above
遇到問題

1.計算電壓與角度變數要用浮點數 float宣告,計算式的數字要加小數點且加個0,所以起初值都是0,改了就好了
2.很奇怪的是,選鈕一直轉 ,analog read 讀到的180後直接跳1023,估計應該是被map過後,所以改了一下
3.改來改去又忘了接USB線
4.新增 SERIAL監控 忘了 用 Serial.begin(9600) 開啟,所以起初沒有輸出到監控畫面
5.一直切換到簿同開發畫面(其他開啟的程式視窗)會產生異常,可見編譯與燒錄時,IDE都會取得作用中的視窗 


結果畫面


結果錄影


2014年12月29日 星期一

Lab09-ARDUINO LCD 游標閃動-第9個實驗練習

材料:
1•ARDUINO UNO R3 version with USB line
2•LCD1602a compatible with IC Hitachi 44780-相容前者IC的液晶螢幕顯示屏。
3•一堆線十幾條。
4•麵包板
5•可變電阻10K 或一般電阻9k-10k
#其實關於目前LCD 的操作,硬體接線基本上一致
官方提供的範例,沒有太難的難度
所以要找尋應用的範例,必須進入 Reference 與Blog 找找(右上角有搜尋文字框)
或者去網路上搜尋一下

ARDUINO IDE 開發環境官方程式碼載入位置


游標閃動的作用
應該是告訴我們目前正要寫入的位置,

那這有甚麼用呢? 我認為
1.就像Windows ,你知道它還活著
2.接下來的數入會不會超過顯示的可見區
3.移動由標記住選擇 設定選項 或者想要修改 顯示字元裡的字,然後用插入的動作來填入在適當的位置

官方程式碼 EXAMPLE 如下=======================

/*
  LiquidCrystal Library - Cursor
 液晶函式庫-游標
 Demonstrates the use a 16x2 LCD display.  The LiquidCrystal
 展示 使用 一個 16x2 型號的 LCD 顯示屏. 這液晶
 library works with all LCD displays that are compatible with the
 函式庫 可操作 所有使用相容Hitachi HD44780 驅動器的 LCD.
 Hitachi HD44780 driver. There are many of them out there, and you
                         市面上有多種,
 can usually tell them by the 16-pin interface.
  你通常可從具16pin 接腳的介面來辨識出
 This sketch prints "Hello World!" to the LCD and
 這個腳本 輸出  " Hellow World! "到LCD 上,
 uses the cursor()  and noCursor() methods to turn
 並且使用 游標 cursor() 和 無游標 noCursor() 方法 來 
 on and off the cursor.
  開啓跟關閉 游標 (顯示或隱藏)

 The circuit: 電路
 * LCD RS pin to digital pin 12     -- LCD 上 RS腳位 接 ARDUINO 數位D12腳
 * LCD Enable pin to digital pin 11 --LCD 上致能腳位 接 ARDUINO 數位D11腳
 * LCD D4 pin to digital pin 5      ---LCD 上 D4 接 ARDUINO 數位D5
 * LCD D5 pin to digital pin 4         LCD 上 D5 接 ARDUINO 數位D4
 * LCD D6 pin to digital pin 3         LCD 上 D6 接 ARDUINO 數位D3
 * LCD D7 pin to digital pin 2         LCD 上 D7 接 ARDUINO 數位D2
 * LCD R/W pin to ground               LCD 上 R/W 接 ARDUINO GND 接地腳位
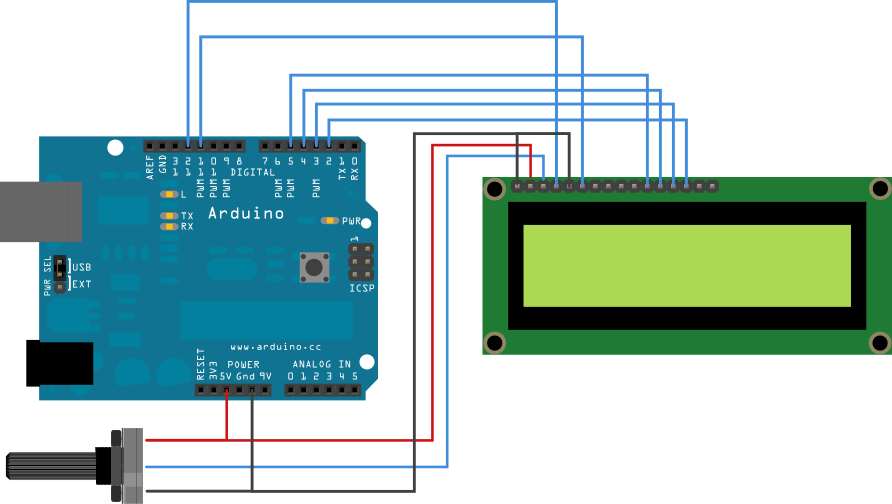
 * 10K resistor:                       10K 電阻(我的9.5K 對比較佳)
 * ends to +5V and ground              ㄧ端 接 正+5V, 一端接GND 負極  
 * wiper to LCD VO pin (pin 3)         從電阻後端 接分壓 線 接到LCD V0 腳位

 Library originally added 18 Apr 2008
 by David A. Mellis
 library modified 5 Jul 2009
 by Limor Fried (http://www.ladyada.net)
 example added 9 Jul 2009
 by Tom Igoe
 modified 22 Nov 2010
 by Tom Igoe

 This example code is in the public domain.

 http://arduino.cc/en/Tutorial/LiquidCrystalCursor

 */

// include the library code: 加入 函式庫檔案
#include <LiquidCrystal.h>

// initialize the library with the numbers of the interface pins 初始化腳位定義
LiquidCrystal lcd(12, 11, 5, 4, 3, 2);

void setup() {
  // set up the LCD's number of columns and rows: 初始化 設定LCD 欄數與列數
  lcd.begin(16, 2);
  // Print a message to the LCD.  輸出 訊息 到LCD上
  lcd.print("hello, world!");
}

void loop() {
  // Turn off the cursor: 打開游標
  lcd.noCursor();
  delay(500);
  // Turn on the cursor: 關閉游標 
  lcd.cursor();
  delay(500);
}

硬體接線:

如一般的LCD範例
http://arduino.cc/en/Tutorial/LiquidCrystal


結果圖片:


結果影片:


可能遇到問題:

1.USB線沒接好
2.通訊PORT沒選對


應用思考題:

1.閃動快速 跟慢速 可否依據 傳輸速率或者電壓大小來動態改變 
2.偵測心跳速率 是否用 閃爍顯示心跳狀況? 
3.移動的位置 來反應使用這輸入的字元?

2014年12月28日 星期日

ARDUINO-LCD 函式庫

來源
http://blog.sina.com.cn/s/blog_5d940a1b0101344q.html


  1. LiquidCrystal()——定义你的LCD的接口:各个引脚连接的I/O口编号,格式为LiquidCrystal(rs,+enable,+d4,+d5,+d6,+d7)
    LiquidCrystal(rs,+rw,+enable,+d4,+d5,+d6,+d7)
    LiquidCrystal(rs,+enable,+d0,+d1,+d2,+d3,+d4,+d5,+d6,+d7)
    LiquidCrystal(rs,+rw,+enable,+d0,+d1,+d2,+d3,+d4,+d5,+d6,+d7)

  2. begin()——定义LCD的长宽(n列×n行),格式lcd.begin(cols,+rows)

  3. clear()——清空LCD,格式lcd.clear()

  4. home()——把光标移回左上角,即从头开始输出,格式lcd.home()

  5. setCursor()——移动光标到特定位置,格式lcd.setCursor(col,+row)

  6. write()——在屏幕上显示内容(必须是一个变量,如”Serial.read()”),格式lcd.write(data)

  7. print()——在屏幕上显示内容(字母、字符串,等等),格式lcd.print(data)
    lcd.print(data,+BASE)

  8. cursor()——显示光标(一条下划线),格式lcd.cursor()

  9. noCursor()——隐藏光标,格式lcd.noCursor()

  10. blink()——闪烁光标,格式lcd.blink()

  11. noBlink()——光标停止闪烁,格式lcd.noBlink()

  12. display()——(在使用noDisplay()函数关闭显示后)打开显示(并恢复原来内容),格式lcd.display()

  13. noDisplay()——关闭显示,但不会丢失原来显示的内容,格式为lcd.noDisplay()

  14. scrollDisplayLeft()——把显示的内容向左滚动一格,格式lcd.scrollDisplayLeft()

  15. scrollDisplayRight()——把显示的内容向右滚动一格,格式为lcd.scrollDisplayRight()

  16. autoscroll()——打开自动滚动,这使每个新的字符出现后,原有的字符都移动一格:如果字符一开始从左到右(默认),那么就往左移动一格,否则就向右移动,格式lcd.autoscroll()

  17. noAutoscroll()——关闭自动滚动,格式lcd.noAutoscroll()

  18. leftToRight()——从左往右显示,也就是说显示的字符会从左往右排列(默认),但屏幕上已经有的字符不受影响,格式lcd.leftToRight()

  19. rightToLeft()——从右往左显示,格式lcd.rightToLeft()

  20. createChar()——自造字符,最多5×8像素,编号0-7,字符的每个像素显示与否由数组里的数(0-不显示,1-显示)决定,格式lcd.createChar(num,+data),有点难理解,可以看一个例子

2014年12月27日 星期六

程式資源網站&硬體網站--彙整在這2014DEC Version1

程式語言 學習資源:
//置頂文//幾個程式語言的學習連結(20130916更新)
=======論壇======
程式設計俱樂部
http://www.programmer-club.com.tw/newuser.asp
======學習網======
C++學習筆記
http://openhome.cc/Gossip/CppGossip/
JAVA學習筆記(老師分享)
http://openhome.cc/Gossip/JavaGossip-V1/
上述兩個學習筆記的主頁
http://openhome.cc/Gossip/
JAVA(PS:老師說這個比較久沒改版了)
http://programming.im.ncnu.edu.tw/J_index.html
======Eclipse開發工具安裝=======
台灣大學Eclipse簡介與教學
http://www.cc.ntu.edu.tw/chinese/epaper/…/20120320_2003.html
不分類文章有興趣的看看 感謝版友潮濰分享
===========國內===========
C++ 程式設計
http://www.tcgs.tc.edu.tw/~sagit/cpp/
台中女中程式解題系統
http://www.tcgs.tc.edu.tw:1218/
高中生程式解題系統
http://zerojudge.tw/
程式人雜誌-----開放公益出版品(電子書)
http://programmermagazine.github.io/home/

產業資訊-Information:
www.hkepc.com
www.eettaiwan.com 電子工程專輯/台灣
www.eet-china.com 电子工程专辑/大陸
www.eetimes.com 電子工程英文網站

www.digitimes.com 英文網站
www.digitimes.com.tw 台灣網站
gb-www.digitimes.com.tw 簡體版

單晶片
http://www.ekenrooi.net/lcd/lcd.shtml
http//www.8052.com   8051 8052 8031 系列,鄉民介紹很完整的網站?

maker:
http://oszine.com/   雜誌

ARDUNO+:
http://arduino.cc/ 官網
http://arduino.cc/en/Main/buy 官方各地代理商名單
http://coopermaa2nd.blogspot.tw/  很知名的ARDUINO  Google blog作者
http://yehnan.blogspot.tw/   出書的老師
https://www.facebook.com/groups/Arduino.Taiwan/   
https://www.facebook.com/groups/arduinotaipei/  
http://s4a.cat/  圖形撰寫的開發環境
http://www.geek-workshop.com/forum.php 大陸知名網站 極客工坊
http://www.engineersgallery.com/ 不錯的工程網站 單晶跟機械等都有
http://fritzing.org/home/
http://arduino.tw/  台灣區
http://www.arduino.cn/ 大陸區
http://www.evelock.com/blog/

Arduino綜合相關:

S4A相關:
Ardublock:
http://jackedu.blogspot.tw/search/label/ArduBlock


S4A:
http://S4A.cat
http://website.mlc.edu.tw/wzd000393/index/page/id/39327


Scratch:  
http://scratch.mit.edu/
http://scratch.mit.edu/projects/editor/?tip_bar=getStarted   最入門基礎的教學

C:
http://openhome.cc/Gossip/CppGossip/
http://www.cplusplus.com/reference/ios/showbase/  很好的函數參考

ROBOT 機器人:
http://www.robofun.net/forum/index.php
http://www.robosmart.com.tw/zh-tw/classes_con.php?id=NDU%3D
www.playrobot.com  機器人。普特企業-賣各類ARDUINO 板子(原廠總是貴)

程式語言:
http://pizgchen.blogspot.tw/

RUTIEN
http://goods.ruten.com.tw/item/show?21304240633132

教學出版
Http://www.cavedu.com CAVEDU 教育團隊
http://www.e-happy.com.tw 文淵工作室
Http://www.facebook.com/ehappytw 文淵工作室臉書

2014年12月26日 星期五

ARDUINO 番外A-程式語言函式概略一

量:
  • HIGH | LOW 表示數字IO口的電平,HIGH 表示高電平(1),LOW 表示低電平(0)。
  • INPUT | OUTPUT 表示數字IO口的方向,INPUT 表示輸入(高阻態),OUTPUT 表示輸出(AVR能提供5V電壓 40mA電流)。
  • true | false true 表示真(1),false表示假(0)。
結構
  • void setup() 初始化變數,管腳模式,調用庫函數等
  • void loop() 連續執行函數內的語句
數字 I/O
  • pinMode(pin, mode) 數位IO口輸入輸出模式定義函數,pin表示為013 mode表示為INPUTOUTPUT
  • digitalWrite(pin, value) 數字IO口輸出電平定義函數,pin表示為013value表示為HIGHLOW。比如定義HIGH可以驅動LED
  • int digitalRead(pin) 數位IO口讀輸入電平函數,pin表示為013value表示為HIGHLOW。比如可以讀數字感測器。
模擬 I/O
  • int analogRead(pin) 類比IO口讀函數,pin表示為05Arduino Diecimila05Arduino nano07)。比如可以讀模擬感測器(10AD05V表示為01023)。
  • analogWrite(pin, value) - PWM 數位IOPWM輸出函數,Arduino數位IO口標注了PWMIO口可使用該函數,pin表示3, 5, 6, 9, 10, 11value表示為0255。比如可用於電機PWM調速或音樂播放。
擴展 I/O
  • shiftOut(dataPin, clockPin, bitOrder, value) SPI外部IO擴展函數,通常使用帶SPI介面的74HC5958IO擴展,dataPin為資料口,clockPin為時鐘口,bitOrder為資料傳輸方向(MSBFIRST高位在前,LSBFIRST低位在前),value表示所要傳送的資料(0255),另外還需要一個IO口做74HC595的使能控制。
  • unsigned long pulseIn(pin, value) 脈衝長度記錄函數,返回時間參數(us),pin表示為013valueHIGHLOW。比如valueHIGH,那麼當pin輸入為高電平時,開始計時,當pin輸入為低電平時,停止計時,然後返回該時間。

時間函數
  • unsigned long millis() 返回時間函數(單位ms),該函數是指,當程式運行就開始計時並返回記錄的參數,該參數溢出大概需要50天時間。
  • delay(ms) 延時函數(單位ms)。
  • delayMicroseconds(us) 延時函數(單位us)。
數學函數
  • min(x, y) 求最小值
  • max(x, y) 求最大值
  • abs(x) 計算絕對值
  • constrain(x, a, b) 約束函數,下限a,上限bx必須在ab之間才能返回。
  • map(value, fromLow, fromHigh, toLow, toHigh) 約束函數,value必須在fromLowtoLow之間和fromHightoHigh之間。
  • pow(base, exponent) 開方函數,baseexponent次方。
  • sq(x) 平方
  • sqrt(x) 開根號
三角函數
亂數函數
  • randomSeed(seed) 亂數埠定義函數,seed表示讀類比口analogRead(pin)函數
  • long random(max) 亂數函數,返回資料大於等於0,小於max
  • long random(min, max) 亂數函數,返回資料大於等於min,小於max
外部中斷函數
  • attachInterrupt(interrupt, , mode) 外部中斷只能用到數字IO23interrupt表示中斷口初始01,表示一個功能函數,modeLOW低電平中斷,CHANGE有變化就中斷,RISING上升沿中斷,FALLING 下降沿中斷。
  • detachInterrupt(interrupt) 中斷開關,interrupt=1 開,interrupt=0 關。
中斷使能函數
串口收發函數


/************Arduino語言庫檔*************/
官方庫文件
非官方庫文件
  • DateTime - a library for keeping track of the current date and time in software.日期與時間
  • Debounce - for reading noisy digital inputs (e.g. from buttons)
  • Firmata - for communicating with applications on the computer using a standard serial protocol.
  • GLCD - graphics routines for LCD based on the KS0108 or equivalent chipset.
  • LCD - control LCDs (using 8 data lines)
  • LCD 4 Bit - control LCDs (using 4 data lines)
  • LedControl - for controlling LED matrices or seven-segment displays with a MAX7221 or MAX7219.
  • LedControl - an alternative to the Matrix library for driving multiple LEDs with Maxim chips.
  • Messenger - for processing text-based messages from the computer
  • Metro - help you time actions at regular intervals
  • MsTimer2 - uses the timer 2 interrupt to trigger an action every N milliseconds.
  • OneWire - control devices (from Dallas Semiconductor) that use the One Wire protocol.
  • PS2Keyboard - read characters from a PS2 keyboard.
  • Servo - provides software support for Servo motors on any pins.
  • Servotimer1 - provides hardware support for Servo motors on pins 9 and 10
  • Simple Message System - send messages between Arduino and the computer
  • SSerial2Mobile - send text messages or emails using a cell phone (via AT commands over software serial)
  • TextString - handle strings
  • TLC5940 - 16 channel 12 bit PWM controller.
  • X10 - Sending X10 signals over AC power lines
/****************************************/