材料:
1•ARDUINO UNO R3 version with USB line2•LCD1602a compatible with IC Hitachi 44780-相容前者IC的液晶螢幕顯示屏。
3•一堆線十幾條。
4•麵包板
4•麵包板
5•可變電阻10K 或一般電阻9k-10k
#其實關於目前LCD 的操作,硬體接線基本上一致
官方提供的範例,沒有太難的難度
所以要找尋應用的範例,必須進入 Reference 與Blog 找找(右上角有搜尋文字框)
或者去網路上搜尋一下
ARDUINO IDE 開發環境官方程式碼載入位置
游標閃動的作用
應該是告訴我們目前正要寫入的位置,
那這有甚麼用呢? 我認為
1.就像Windows ,你知道它還活著
2.接下來的數入會不會超過顯示的可見區
3.移動由標記住選擇 設定選項 或者想要修改 顯示字元裡的字,然後用插入的動作來填入在適當的位置
官方程式碼 EXAMPLE 如下=======================
官方提供的範例,沒有太難的難度
所以要找尋應用的範例,必須進入 Reference 與Blog 找找(右上角有搜尋文字框)
或者去網路上搜尋一下
ARDUINO IDE 開發環境官方程式碼載入位置
游標閃動的作用
應該是告訴我們目前正要寫入的位置,
那這有甚麼用呢? 我認為
1.就像Windows ,你知道它還活著
2.接下來的數入會不會超過顯示的可見區
3.移動由標記住選擇 設定選項 或者想要修改 顯示字元裡的字,然後用插入的動作來填入在適當的位置
官方程式碼 EXAMPLE 如下=======================
/*
  LiquidCrystal Library - Cursor
 液晶函式庫-游標
 Demonstrates the use a 16x2 LCD display.  The LiquidCrystal
 展示 使用 一個 16x2 型號的 LCD 顯示屏. 這液晶
 library works with all LCD displays that are compatible with the
 函式庫 可操作 所有使用相容Hitachi HD44780 驅動器的 LCD.
 Hitachi HD44780 driver. There are many of them out there, and you
                         市面上有多種,
 can usually tell them by the 16-pin interface.
  你通常可從具16pin 接腳的介面來辨識出
This sketch prints "Hello World!" to the LCD and
 這個腳本 輸出  " Hellow World! "到LCD 上,
 uses the cursor()  and noCursor() methods to turn
 並且使用 游標 cursor() 和 無游標 noCursor() 方法 來
 on and off the cursor.
  開啓跟關閉 游標 (顯示或隱藏)
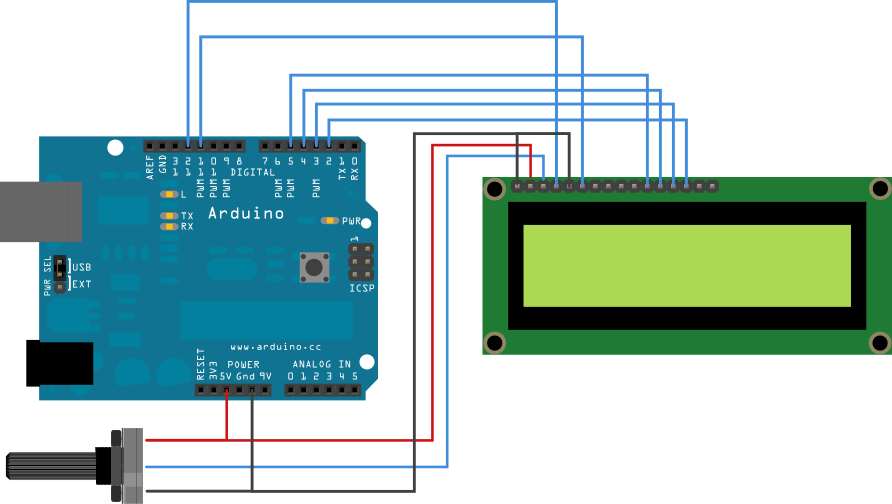
 The circuit: 電路
 * LCD RS pin to digital pin 12     -- LCD 上 RS腳位 接 ARDUINO 數位D12腳
 * LCD Enable pin to digital pin 11 --LCD 上致能腳位 接 ARDUINO 數位D11腳
 * LCD D4 pin to digital pin 5      ---LCD 上 D4 接 ARDUINO 數位D5
 * LCD D5 pin to digital pin 4         LCD 上 D5 接 ARDUINO 數位D4
* LCD D6 pin to digital pin 3 LCD 上 D6 接 ARDUINO 數位D3
* LCD D7 pin to digital pin 2 LCD 上 D7 接 ARDUINO 數位D2
* LCD R/W pin to ground LCD 上 R/W 接 ARDUINO GND 接地腳位
 * 10K resistor:                       10K 電阻(我的9.5K 對比較佳)
 * ends to +5V and ground              ㄧ端 接 正+5V, 一端接GND 負極
 * wiper to LCD VO pin (pin 3)         從電阻後端 接分壓 線 接到LCD V0 腳位

 Library originally added 18 Apr 2008
 by David A. Mellis
 library modified 5 Jul 2009
 by Limor Fried (http://www.ladyada.net)
 example added 9 Jul 2009
 by Tom Igoe
 modified 22 Nov 2010
 by Tom Igoe

 This example code is in the public domain.

 http://arduino.cc/en/Tutorial/LiquidCrystalCursor

 */

// include the library code: 加入 函式庫檔案
#include <LiquidCrystal.h>

// initialize the library with the numbers of the interface pins 初始化腳位定義
LiquidCrystal lcd(12, 11, 5, 4, 3, 2);

void setup() {
  // set up the LCD's number of columns and rows: 初始化 設定LCD 欄數與列數
  lcd.begin(16, 2);
  // Print a message to the LCD.  輸出 訊息 到LCD上
  lcd.print("hello, world!");
}

void loop() {
  // Turn off the cursor: 打開游標
  lcd.noCursor();
  delay(500);
  // Turn on the cursor: 關閉游標
  lcd.cursor();
  delay(500);
}
硬體接線:
如一般的LCD範例http://arduino.cc/en/Tutorial/LiquidCrystal
結果圖片:
結果影片:
可能遇到問題:
1.USB線沒接好
2.通訊PORT沒選對
應用思考題:
1.閃動快速 跟慢速 可否依據 傳輸速率或者電壓大小來動態改變
2.偵測心跳速率 是否用 閃爍顯示心跳狀況?
3.移動的位置 來反應使用這輸入的字元?